Aluminum solar mounting rails support panels through heat, rain, wind, and years of daily expansion. Their condition directly affects system safety, alignment, and maintenance costs. What is the lifespan of aluminum solar mounting rails? In many rooftop systems, quality rails can last 20 to 30 years, but the environment changes that estimate. Coastal salt, trapped moisture, polluted air, and contact with incompatible metals can accelerate corrosion. Even strong aluminum can weaken when small installation problems remain unnoticed.
This guide explains practical ways to extend rail service life, based on common field inspection methods and sound installation principles. It covers correct drainage, compatible fasteners, protective separation, torque checks, and routine visual inspections. A rail should not collect water around a bolt or sit against wet debris. Salt deposits may look harmless, yet they can leave white corrosion marks and damage nearby connections. Cleaning helps, but aggressive tools can scratch the protective surface. Gentle methods work better.
Small details matter.
Installers should follow the rail manufacturer’s instructions and local structural requirements. Records of inspections, replacements, and unusual weather events can also support better decisions. Still, no maintenance plan is perfect. A missed washer, loose clamp, or unnoticed scratch may shorten the system’s useful life. Regular attention helps reveal these weaknesses before they become expensive failures.
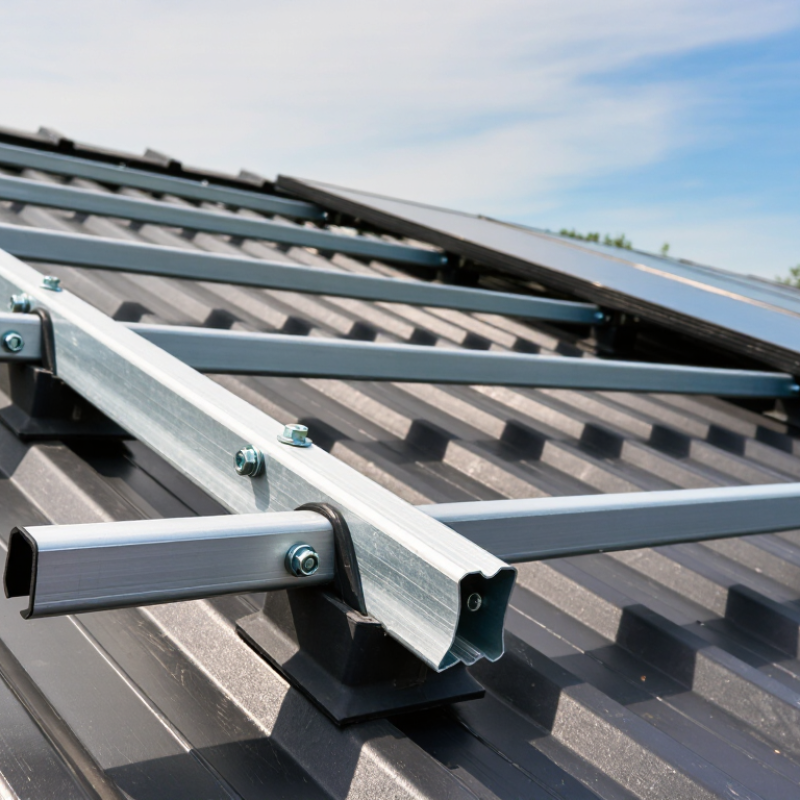
Aluminum solar mounting rails usually fail slowly, not suddenly. An early warning may be a white, chalky film near a fastener. Moisture trapped beneath dirt or brackets accelerates corrosion. Coastal salt makes this process faster. Industrial dust and bird droppings can hold water against the metal. Small scratches also expose fresh aluminum, especially after careless handling during installation.
Dissimilar metals create another risk. When aluminum touches certain untreated steel parts, galvanic corrosion can develop in a wet environment. Incompatible washers or damaged protective coatings may worsen it. Over-tightened bolts can deform the rail and damage its surface. Loose bolts create movement, allowing wind vibration to enlarge holes. Thermal expansion matters too. Rails heat sharply under summer sun, then contract at night. Repeated movement stresses joints, clamps, and splice connections.
Drainage deserves attention. A blocked channel can leave water standing after rain. Inspectors should check end caps, low points, fastener heads, and areas beneath modules. Use clean water and approved mild cleaners, not harsh alkaline products. Keep inspection records with photographs and torque findings. A perfect maintenance schedule is rarely followed. I may be too cautious, but replacing one damaged rail is cheaper than guessing about hidden corrosion.
Aluminum solar rails face rain, heat, dust, and repeated temperature changes. Material selection strongly affects service life. Choose structural aluminum with a documented alloy, temper, and load rating. Common architectural grades can perform well, but only when engineering data supports the rail design. Do not judge durability by shine. Inspect cut ends, drilled holes, and rail channels. These areas expose fresh metal and often collect moisture.
Anodizing forms a protective oxide layer that improves resistance to weathering and surface wear. Powder coating can add another barrier, especially in dusty or visually sensitive locations. The coating must remain continuous around edges, joints, and fastener openings. A thin, damaged layer offers little protection. Use stainless or otherwise compatible fasteners to reduce galvanic corrosion. Keep dissimilar metals separated when the installation environment stays wet. Coastal roofs require greater care because salt deposits can attack exposed surfaces quickly.
During installation, protect rails from dragging across concrete or steel. Remove protective films before they bake in sunlight. Clean accumulated dirt with clean water and a mild, non-abrasive detergent. Harsh chemicals can dull or weaken the finish. In field inspections, a shallow scratch often appears harmless. It is not always harmless. Seal exposed areas according to the finish supplier’s instructions. Check rail channels after storms, especially where water cannot drain freely. I have seen small installation shortcuts create larger maintenance problems later. A careful installer still needs to question old habits.
Typical planning ranges for aluminum rail service life by protective finish and exposure environment. Actual performance depends on alloy selection, coating quality, drainage, fastener compatibility, and maintenance.
Anodized and marine-grade anodized finishes generally provide stronger long-term corrosion resistance than untreated mill-finish aluminum, especially in coastal or high-humidity locations.
Correct rail installation begins with the roof, not the aluminum. Check the structural drawings, rafter spacing, roof slope, and local wind and snow loads before placing hardware. ASCE 7-22 load calculations should guide attachment spacing and fastener selection. A rail that looks straight may still transfer force poorly.
Keep every attachment centered on structural members. Pre-drill accurately, remove metal chips, and use compatible flashing around penetrations. Tighten fasteners with a calibrated torque wrench, following the engineering specification. Over-tightening can crush roofing layers or deform the rail. Under-tightening allows movement, noise, and water entry. Leave designed gaps for thermal expansion, and keep drainage paths clear. Do not trap moisture beneath clamps.
Galvanic corrosion is another quiet threat. Isolate aluminum from incompatible metals with approved washers or barriers, especially in coastal or industrial environments. IEA PVPS Task 13 reports that installation defects remain a significant source of early photovoltaic system problems. The connection matters. NREL’s analysis of photovoltaic field data found median module degradation near 0.5% per year, showing why small installation stresses deserve attention over decades. After installation, inspect torque marks, clamp alignment, sealant condition, and rail movement. A rushed installation can look perfect. It may not be. Rechecking one uneven clamp is cheaper than correcting a failed attachment years later.
| Installation Dimension | Correct Practice | Technical Reason | Inspection or Maintenance Guidance | Priority |
|---|---|---|---|---|
| Structural Design Loads | Size rails, fasteners, roof attachments, and foundations for the site-specific wind, snow, seismic, and dead loads required by the applicable building code. | Under-designed components may experience excessive deflection, fatigue, uplift, or permanent deformation. | Verify the structural calculations and local permit requirements before installation and whenever the array layout changes. | Critical |
| Rail Alignment | Install rails in straight, level runs and keep adjacent rail sections properly aligned at splices. Do not force rails into position during fastening. | Misalignment creates concentrated stresses at clamps, splices, and attachment points. | Check alignment with a level, straightedge, or laser before fully tightening the system. | High |
| Rail Splices | Use approved splice locations and maintain the required joint position, gap, and fastener engagement specified for the rail system. | Correct splicing allows the rail to transfer loads while accommodating normal thermal movement. | Inspect splice hardware for loosening, movement, or corrosion during periodic maintenance. | High |
| Fastener Torque | Tighten bolts, nuts, and clamps with a calibrated torque wrench to the values specified for the particular fastener and connection. | Under-torquing can cause slippage; over-torquing can strip threads, deform aluminum, or damage protective coatings. | Record torque settings during installation and investigate any fastener that turns unusually easily during inspection. | Critical |
| Fastener Compatibility | Use fasteners and washers that are suitable for outdoor exposure and compatible with aluminum and the supporting roof or structure. | Incompatible metals can accelerate galvanic corrosion, especially where moisture and electrolytes are present. | Look for white powder, pitting, staining, seized threads, or dissimilar-metal contact at connections. | Critical |
| Galvanic Isolation | Where required by the system design, use compatible isolating washers, coatings, sleeves, or separation layers between dissimilar metals. | Electrical contact between dissimilar metals in a wet environment can increase galvanic corrosion of aluminum. | Confirm that isolation materials remain intact and have not been displaced during installation or maintenance. | High |
| Roof Attachment Sealing | Install roof penetrations, flashing, and sealants according to the roofing system requirements. Do not rely on sealant as the only structural attachment. | Water intrusion can damage the roof structure and create a persistently wet environment that promotes corrosion. | Inspect seals and flashing after severe weather and during scheduled roof maintenance. | Critical |
| Drainage and Debris | Keep rail channels, slots, and drainage paths free of leaves, dirt, metal shavings, and standing water. | Trapped moisture and debris can accelerate corrosion and obstruct water drainage. | Clean affected areas at least annually or more often in locations with heavy dust, pollen, or coastal exposure. | High |
| Cut Ends and Drilled Areas | Remove burrs and treat exposed aluminum surfaces or cut ends using a compatible corrosion-protection method specified for the system. | Cut edges and drilled areas have less factory protection and can become initiation points for corrosion or cracking. | Inspect modified areas for pitting, sharp edges, coating damage, or premature discoloration. | High |
| Thermal Expansion | Follow the rail system requirements for splice placement, expansion gaps, clamp positioning, and fixed-point locations. | Aluminum expands and contracts with temperature changes; restrained movement can stress rails and attachments. | Check for bowed rails, displaced clamps, elongated holes, or unusual noises after seasonal temperature changes. | High |
| Module Clamp Position | Place end and mid clamps within the module manufacturer’s permitted clamping zones and keep clamp faces fully engaged. | Incorrect clamp locations can overstress module frames or transfer loads unevenly into the rails. | Verify clamp position whenever modules are replaced, repositioned, or serviced. | Critical |
| Cantilever Length | Keep rail overhangs and unsupported spans within the limits established by the structural design and rail system instructions. | Excessive cantilever increases bending moments, deflection, and fatigue at attachment points. | Measure overhangs during installation and inspect for visible sagging or movement after major storms. | Critical |
| Cable Management | Secure cables away from sharp edges, standing water, moving joints, and hot surfaces without over-tightening cable ties. | Chafing, ultraviolet exposure, and trapped moisture can damage insulation and contribute to electrical faults or corrosion. | Inspect cable supports and insulation during routine system checks; replace damaged supports promptly. | High |
| Environmental Exposure | Use materials and protective measures appropriate for coastal salt spray, industrial pollution, high humidity, freeze-thaw cycles, or heavy snow. | Environmental conditions strongly affect corrosion rates and mechanical durability. | Increase inspection frequency in coastal and industrial areas and rinse salt or deposits with clean water when appropriate. | High |
| Routine Inspection | Perform a visual inspection at least annually and after severe wind, hail, heavy snow, seismic activity, or roof work. | Early detection of loosened hardware, corrosion, deformation, and seal failure prevents minor defects from becoming structural problems. | Document findings with photographs and address safety-critical defects before returning the system to normal operation. | High |
Aluminum rails resist rust, but they are not immune to corrosion. Salt spray, trapped moisture, and dissimilar metals can create hidden damage around bolts and clamps. The NACE IMPACT study estimates that corrosion costs the global economy about 3.4% of annual gross domestic product. Solar structures face smaller exposures, yet they remain outdoors for decades.
Inspect rails after heavy rain, coastal storms, and dusty periods. Look for white powder, dark staining, blocked drainage paths, and moisture beneath washers. Clean surfaces with fresh water and a soft brush. Avoid aggressive abrasives. They can scratch protective oxide layers and create rough areas where dirt stays longer. IEA PVPS Task 13 research indicates that soiling commonly reduces photovoltaic energy yield by several percent each year. Dirt on rails can also retain moisture, especially near roof penetrations.
Tips: Rinse salt deposits every few months in coastal locations. Keep rail channels open. Separate incompatible metals with approved isolation washers. Check fasteners for loose joints and unusual staining. Do not seal drainage holes. A dry rail is usually safer than a perfectly polished rail. Cleaning too often can also be wasteful. The better approach is measured inspection, not routine guesswork. Record photographs and corrosion locations, then compare them during the next service visit.
Aluminum solar mounting rails can last for decades, but only when small defects are found early. In my inspections, the most useful checks begin at connection points, not the rail’s center. Look for elongated holes, raised metal, hairline cracks, and movement around fasteners. Check after severe wind, heavy snow, or maintenance work. A loose clamp may leave a bright rub mark. That detail matters. Use a calibrated torque wrench and follow the system’s engineering specifications; guessing by hand is unreliable. Record the date, location, torque result, and photographs of unusual wear.
Corrosion deserves close attention, even on aluminum. White powder, dark staining, or trapped water can signal a developing problem. Inspect interfaces between aluminum, stainless steel, coated steel, and other metals. Dissimilar-metal contact can accelerate corrosion when moisture remains present. Replace damaged isolation washers or barriers with compatible materials. Keep drainage paths clear. Do not drill new holes or remove structural material without qualified engineering review. That shortcut can weaken load paths and compromise the original design.
Cleaning should be gentle. Remove dust, leaves, bird debris, and salt deposits with water and a soft brush. Avoid harsh chemicals, abrasive pads, and excessive pressure that could damage protective surfaces or seals. Check rail alignment with a straightedge where movement is suspected. Minor displacement may be repairable; bending, cracking, or repeated loosening requires a competent structural professional. My own checklist is not perfect. I sometimes miss hidden fasteners beneath modules. Paired inspections and honest maintenance records are more dependable than memory.
Look for white, chalky film near bolts, clamps, or scratched areas. Dark stains can also indicate trapped moisture. Check closely.
Salt spray leaves deposits on exposed metal. Moisture then remains around fasteners and joints. Rinse salt from rails every few months.
Yes. Dirt and droppings can hold water against the rail. This creates damp patches near brackets and roof penetrations.
Galvanic corrosion may develop in wet conditions. Use approved isolation washers or barriers between incompatible metals. Small details matter.
Use clean water and a soft brush. Mild, approved cleaners may help. Avoid harsh alkaline products and aggressive abrasives.
Over-tightened bolts can deform rails or damage roofing layers. Loose bolts allow movement, noise, and enlarged holes. Use a calibrated torque wrench.
Center attachments on structural members. Pre-drill accurately and remove metal chips. Keep drainage channels open and leave designed expansion gaps.
Check end caps, low points, bolt heads, clamps, and areas beneath modules. Photograph unusual staining or corrosion. Compare later.
Inspect after heavy rain, coastal storms, and dusty periods. Scheduled reviews also help. A perfect routine is unlikely, honestly.
Usually, yes. A damaged rail may hide weakened connections. I may be overly cautious, but guessing can cost more later.
Extending the lifespan of aluminum solar mounting rails begins with understanding the conditions that cause premature wear. Prolonged exposure to moisture, salt, pollution, temperature changes, strong winds, and incompatible metals can lead to corrosion, surface damage, or structural weakening. What is the lifespan of aluminum solar mounting rails depends on material quality, protective finishes, installation accuracy, local climate, and regular care. Selecting corrosion-resistant aluminum, applying suitable protective coatings, and using compatible fasteners can significantly improve long-term durability.
Correct installation is equally important. Rails should be aligned properly, securely fastened, and designed to allow water to drain rather than collect. Routine inspections can identify loose connections, dirt buildup, blocked drainage areas, scratches, and early signs of corrosion. Cleaning the rails with appropriate methods and repairing damaged protective surfaces promptly helps prevent moisture and contamination from causing further deterioration. With sound material choices, careful installation, and consistent maintenance, aluminum solar mounting rails can continue supporting solar panels safely and reliably for many years.

Trike Solar